Showing posts with label dress. Show all posts

12.12.20

Frocktails 2020

I seem to have bloggers block.  I've had this window sitting open on the computer for days, but am  having trouble sitting down and writing.  Frocktails is such a fabulous event that it definitely deserves a post.  It really feels like I am getting together with my tribe.  

I don't think that I talked to so many people this year, but all the sewing talk with those that I did.  Shout out to Vanessa (I hope I haven't got your name wrong in the intervening weeks) who says she still reads my blog...and here I thought that I was back where I started, just blogging for my own records.  So much sewing inspiration in one place.  I learnt about Nerida Hansen fabrics, and have already received an order for her fabrics, hopefully to be made into a summery top for Christmas.  Of course, the most fun is playing Guess The Pattern, discovering new patterns and rediscovering old favourites.

So, onto my dress.


I've had this fabric and pattern combination in mind for a few years now.  It can take me a little while to implement a plan!  I retrieved the fabric from my box of special fabrics, but it was originally from EmmaOneSock.   I think that it is a viscose crepe.  It has a bit of stretch in one direction and a lovely, heavy drape.  The fabric is a print (I haven't done any clever colour blocking).  Sadly, it frays terribly, and I did have a sticky moment when my neck facing pulled away from the dress whilst I was understitching it.  6 mm seam allowances on the facings might have been too narrow for this fabric, and fingers crossed that no more damage happens with wear.


The pattern is Burdastyle 04-2016-122.  I took a bit of a risk in not making a muslin, just grading between sizes and making my usual pattern adjustments.  

The dress pattern is lined.  The lining is for a fairly standard sheath dress.  The outer pattern is shaped as a sheath dress, with extra volume for the drape, and not a-line as the photos would suggest.  I was just about to cut out a Bemberg lining, when I realised that there was no walking room in the lining.  I went back to check the pattern details (I'm not so good at reading pattern instructions these days) and sure enough, it recommended a stretch lining.  My other concern with the lining was that the front neckline gapes a bit, both on the model and in previous versions I have seen made up, and the lining would probably show.  I didn't have a suitable stretch lining fabric on hand.  I thought about just putting a vent in the lining skirt, but in the end, decided that my fabric didn't need a lining and I was better off drafting a facing instead, and cutting it out of the same fabric as the dress.  This had the added bonus of using up the odd shaped remnants of the fabric.


Thanks so much to the organisers of Perth Frocktails.  It really is my favourite event of the year.

18.8.20

Stylearc Asha Dress


I have been wanting a dress with sleeves for ages.  I've been looking through pattern offerings for possibly a year now, but hadn't found quite the dress I wanted.  Originally I wanted a button through dress, and actually I think I still do want a button through dress with sleeves, but in the meantime, I like  the details of the Stylearc Asha dress.

I bought this viscose crepe from Fabulous Fabrics.  

The dress has a shirred waist and shirred hem sleeves.


I don't love shirring elastic.  Mostly because it seems to perish quite quickly, so the garment doesn't last very long.  A couple of years ago I came across this fabulous elastic that gives you the effect of shirring, without having to either sew over shirring elastic or put elastic in your bobbin.  It is also easier to control the amount of stretch that you want.


You simply stretch the elastic the amount that you want, pin it to the garment, and sew between the rows whilst the elastic is stretched.  For the waistband, I found it easier to baste the elastic in place at quarter intervals, rather than pinning.


The other change that I made to the pattern was to continue the neck binding to create a tie.  I mustn't do a good job of button-and-loops because they are always coming undone, and I thought that the longer tie would work with this style of dress.


I met up with some sewing buddies in King's Park today, so I have photos of the dress on me in a different setting!  I'll admit that the elastic waist is a bit on the frumpy side on my pear shape, but I still love the dress.  


2.3.20

Vogue 8894

This is my version of Vogue 8894, sewn in a rayon twill.


I was grateful for previous reviews on Pattern Review that pointed out that the hem facing did not match the dress hem, so I cut my own facing.  I raised the neckline by about an inch.  I also ended up taking hte dress up at the shoulders, about half an inch and doing a square shoulder adjustment.

21.1.20

French Terry Swimsuit Cover

I have been living in Perth for nearly a year now.  This year I'm going to be a bit more prepared for the weather and dress accordingly.  I have learnt that Perth can be cold, even in summer.    I swim early in the morning, and not only can summer mornings be cool, but the wind is often blasting across the ocean. 

This week I dug into my winter clothing to pull out a long sleeved knit dress to throw on to get to the pool.  This gave me the idea to use some French Terry from my stash, previously earmarked for a winter sweater, for a swimsuit cover up. 


I used Simplicity 8790, which is a Sew House Seven pattern.  I modified the pattern to use ribbing on the neckline, cuffs and pocket openings  I cut a size M, grading out to an L.  I ended up taking the side seams in a little, which reduced the pocket opening, but because of the stretchy ribbing, I can still easily get my hand in.  I didn't have enough fabric to make the kangaroo style pocket, so made my own pattern piece for individual pockets on each side.  They are just one layer, top-stitched to the dress, which both reduces bulk and drying time for the terry.  The rib on the neckline has a cross-over detail, similar to the original hood, but this detail doesn't show up well in the photo.

Side photo to show pocket openings.


See below photo for stripe matching.  I didn't get too obsessive about stripe matching; just enough so that it doesn't jar the eyes.  This requires fudging the raglan seams on the front and back, easing in as required and then stretching as required, which is okay in a stretchy knit.  I bought this See You At Six fabric from Maaidesign (still available).  It has stretch in both directions, which is good because I cut this dress across the fabric to get the stripes horizontal.


These photos were taken at the beach, but I actually swim in a heated pool next to the beach...I haven't acclimatised enough to swim regularly in the ocean yet!


15.12.19

20s inspired dress

As part of my "Make Sewing Fun Again" directive, I made a 20's inspired dress.

I have more photos than usual, so you can see all the angled pieces and godet and handkerchief inserts.  I got a lot of practice sewing inset corners on this dress.


The fabric and ribbon was purchased from the Alannah Hill Outlet in Fitzroy during my holiday earlier this year.  The outer is a polyester georgette and the inner is a polyester satin.  I was looking at patterns and directions to draft patterns for a 20's dress, but then I decided I could achieve a more flattering result by adapting a more modern pattern.  

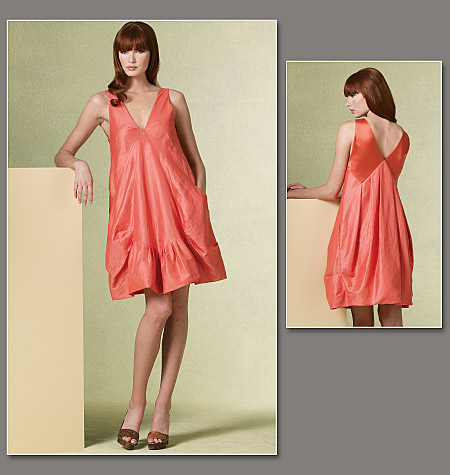
I started with the OOP Vogue 1175 Donna Karan pattern (so, so sad that there are no more Donna Karan and DKNY patterns from Vogue).

Image result for vogue 1175

I can't remember all the changes I made, but here is a photo I took whilst cutting out the back.  I used the back lining instead of the pleated back outer.  I extended the lining to the shape shown by the right-angled ruler.  The CB is actually a bit short and the lining hangs below it, so I should have lengthened this all by about 5 cm.  I then cut godets to insert in the back skirt.


For the front of the dress, I used the top half of the pattern, with fitting changes to raise the depth of the V.  I didn't use the pleated secion of the bottom skirt, instead inserting  handkerchief  inserts segments.

I sewed the dart in the front bodice before sewing rows of ribbon on top.  I used large seam allowances in case the piece "shrunk" with all the sewing of the ribbon.  I didn't have specific plans when I bought the fabric and ribbon, but I wish I had bought twice as much ribbon so that the ribbon was more densely spaced.


I used silk crepe for the lining, that I had dyed and not used for a previous project.  The colour match was pretty good.  The polyester georgette did not press well, so I used a technique that my high school teacher made us use that I have never seen anywhere else.  It involves basting all around the edges to hold the layers where you want them, then pressing, then removing the basting stitches.  As a high school student I could not see the point of this technique at all, but it seems to have served me well here.

Photos before pressing


Photo after pressing

It was fun :)

12.12.19

Digital Print Silk Dress

This is another catch-up blog for a dress I made more than a year ago.  The warmer weather has me reaching for looser fit dresses.

I hoarded this fabric for ages.  It is a digital print silk crepe.  I'm not sure that the final dress is worthy of the stash time though.

The pattern is another version of my self-drafted tank dress.  I added some new features, by shaping the neckline, adding pockets and sewing a high-low hem.


I think that the hem doesn't really work with the loose skirt and maybe that is why I don't wear this more.  I am wondering if I should take to it with the scissors and un-picker and make it an even hem?

26.11.19

Vionnet inspiration for Frocktails

This year I decided to have more fun with my sewing.  My efforts to be more sustainable meant that I wasn't sewing much, because generally, I don't need any more clothes.  However, sewing is my therapy and it keeps my brain ticking through the more dreary aspects of life i.e. it is essential for my mental health.  I don't want to take up new hobbies, because that would mean acquiring more stuff.  Instead I decided to sew some things that I have always wanted to sew, whether it be to try a new fabric, pattern drafting technique or construction technique.  

I have always been drawn to 20's / 30's styles.  When I visited Melbourne, I went to see the Terracotta Warriors at the NGC and then by chance wandered into the Krystyna Campbell-Pretty Fashion exhibition, which I didn't know was showing (sadly my family got restless and I didn't spend as much time looking at these dresses as I would have liked).  

The next day I visited the Alannah Hill outlet next door to the Fabric Store in Fitzroy, and purchased 6 m of a salmon polyester charmeuse, on sale for $5 / m (I also bought a matching georgette and metres and metres of ribbon, which I made up in a different twenties inspired dress, to be blogged another day).  Evening dresses from the thirties take such a lot of fabric, but this price point made it viable.  The wheels started turning in my head and I decided to look up some Vionnet designs for inspiration.  

I visited the Metropolis Bookshop in the city  to see if they had any of the Vionnet books.  They didn't, but I can well recommend this bookstore because they have a great selection of fashion and pattern drafting books (I purchased Fashion Pattern Cutting by Zarida Zaman).  You have to know about this bookstore because it is 6 floors up (I think 6??) in Curtin House on Swanston St, so it is not a shop that you are just going to wander past.  I stumbled on it several years ago when a friend took me to a bar in the same building...yes, everybody else was keen to start sipping cocktails and I was wanting to sit and browse all the fashion design books.

When I got home, I ordered the Bunka Vionnet book online.  The internet is a wonderful thing.


My favourite design in the book was Pattern 14.


I decided to make a skirt and top, rather than the dress as shown.  The dress as designed is very elegant,; there's no arguing with that.  There were two reasons that I didn't make a dress.  Mostly the reason was because the weight of the skirt would drag down the top, and I think ti would be essential to muslin the dress in the same fabric as the final version to get the fit right, and I did not have a spare 6m to play around with (The fabric was cheap enough that I probably could have, but I was back on the other side of the country by this time).  The other reason is that I am very pear shaped, and drop waist dresses are not the most flattering for my shape.  I decided to make a skirt and top in keeping with the spirit of the original design.

For the skirt, I knew I wanted to keep the draped section at the centre back, so I created a skirt yoke that dropped down in a V, to mimic the shape of the original dress back bodice.  I liked the fullness of the skirt, but I decided to incorporate some of the fun panelling seen in many 30's designs.

I borrowed this book from my local library.  It is a huge treasure trove of inspiration.


There are plenty of line drawings and catalogue pictures.


It also has plenty of photos of actual garments being worn on real people.  This is a great reminder that many of the styles do not look exactly like the line drawings.  I bet this socialite was happy when the wrap dress was invented.


I drafted a skirt from my personal skirt block.  I joined the skirt front to the skirt back and closed the darts by adding flare to the skirt.  I drew in lines for the inset panel and cut it separate from the combined yoke / front.  I extended the back skirt in line with the yoke seam to create the back drape.  I added extra fullness to the skirt front.  I really should have added more fullness to the front skirt, as I did not get the effect I was after (go and look at this gorgeous dress to see what I wanted).  That's the problem of not making a skirt muslin.


There is no closure on the top; The pattern pieces are cut on the bias and I relied on the bias of the fabric to slip it over my head.  You can see the grainlines maked on the pattern pieces.  The CB is on the left side and the CF on the right.  I started with one of my personal patterns and manipulated the darts / side seams, rather than use the grid / pattern from the Bunka book.  I made two muslins to refine the fit.


A few construction photos.  This inside view of the front shows that I made a facing.  I interfaced the facing with a lightweight interfacing, but I wish I hadn't interfaced at all, as the interfacing interfered with the bias drape of the top and it did not fit me so well once the facing was added.


Inside back view of the top.  I used a rolled hem on the top, but for the skirt, I just overlocked the hem and turned it up the width of the overlocking.


I used an invisible zipper at the skirt back.  I used petersham for the skirt waistband.  Petersham is actually a bit difficult to get hold of these days.  This one was not a great quality.  I'm not sure what it is made of, but I tried dying it to match the fabric, using my bra-making dyes, which are suitable for nylon and silk.  It did not take enough dye to fully match, but it was better than white.   The skirt yoke does not have any side seams.  Instructions for constructing a petersham waistband usually include steps to tack the petersham down to the side seams.  I was not able to do this, and the petersham did have a tendency to flip up a little.


Here is a close up of one of my inset skirt panels.


Perth Frocktails gave me the perfect opportunity to complete and wear this outfit, so I actually have photos of the outfit being worn.


A side view, showing the angled seams of the top and the inset panel of the skirt.


The back view, showing the drapy bit at the CB of the skirt.  The back cut in triangles of the top are not as dramatic in my version compared to the original, but that is because I wanted my top to be able to be worn with a regular bra.


 It was windy and I was running late so I don't actually have a great front view of the outfit.  These photo do show how swishy it felt.


I had a blast at Frocktails.  It was so fun to meet so many sewists and discuss all the finer details of dresses and fabrics and construction.  Thanks to the committee for Perth Frocktails for organising such a fab event, and to the sponsors (goodie bags!!) and thanks to all those ladies who saw that I was on my own and welcomed me into their sewing discussions.